
I promised a follow-up to the post about QR codes and Google Forms
teaming up. This is probably the best feature of Forms and I’m so excited to
share it with you.
I wanted a way to let parents know when their child came to
class without their homework, 1) for documentation purposes, 2) I honestly wanted to bug the parents so maybe they would bug their child about getting
their homework turned in. I figured getting an email each day letting you know your child didn't turn in their homework could lead to some parental intervention.
While I wanted
this, there was no way I was sitting down at the end of each day and sending 1
to 379 emails to parents about their child's missing homework. Talk about streamlining the
process – a simple Google Sheets add-on makes this process simple, easy, and requires
almost nothing from the teacher after set-up.
So, without further ado, here is
how you get your form to send an email each time a response is received.
{I am showing this from
a teacher perspective – sending emails to parents each time an assignment is
missing. But this could be used for SO many things: responses to items parents
signed up to bring for a class party, email reminders about volunteer sign up
times, etc.}
 |
| What your set-up form looks like to others. |
First, you will need to set up your form. For those steps,
you can read my post here. This post talks about setting up the form, but also
linking it with a QR code for ease of access.
After setting up your form:
1. Access your results spreadsheet. To do this, click on "View Responses" from your Form. This opens up the spreadsheet where your Form responses are kept.

 |
| Your responses from your Form. |
2. At the top toolbar, click on “Add-ons” and then “Get
Add-ons..”

3. Search for “FormMule”. You are looking for “formMule-Email
Merge Utility”. Click “+Free” to install the Add-on

4. After it installs, you will need to re-click on
Add-ons and Click on formMule à
Setup àChoose
source data and set merge type.

5. Under Choose
source data and set merge type go to the drop down menu and select “Form
Responses 1” Make sure the option on the left, under Form trigger is set to “On”. This is what makes the form send an
email after each submission.

6. Click Next:
Templates and Send Condition
7. Under “How many unique email templates do
you want to use” choose 1. You can rename your template if you want. Make
sure Send Condition is set to “—Send
for all rows”

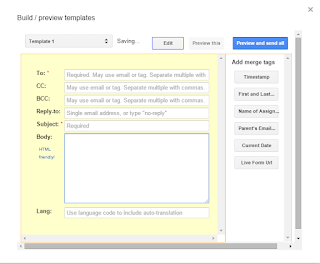
8. This next screen allows you to build your
template that will be used for your email responses. If you have ever done a
mail merge, this will be familiar. Set up your items below:

To: use the column title you used for the Parent’s
Email address
CC: (leave Blank)
BCC: If you need to BCC: yourself, put your email
address there and in the Reply To section
Subject: For the subject, you can make this a generic “Missing
Assignment” title or you can specify it by naming it “First and Last Name:
Missing Assignment.” If you do that, make sure you click to submit that column
title from the options on the right (instead of just typing :First and Last name)
Body: Type what you want in the body. I included my
template below if you need an idea.

Parent/Guardian:
This is an automated email.
<< FIRST and LAST name>> did not return his/her
assignment, <<Title of the missing assignment>>. He/she will be
required to stay after school to make up the assignment.
Let me know if you have any questions.
Amber Bond
7th Grade
Math
XYZ Junior
High
9. When you are
finished building your template click “Preview and send all.” this will take
you to a new screen that shows you a preview of your template. If everything looks
good you can click “Send Now” at the bottom and an email will send for all of
the submissions already in your spreadsheet.
 |
| A preview of what the emails your Form sends will look like. |
From now on,
an email will send automatically after a submission is made in the form.
 |
| Your results spreadsheet will now have a new column with the date and time the emails were sent as well as saying who they were sent to and from. |
 That’s all
there is to it! I absolutely love this feature Google provides. When my
students don’t have their homework, they know to go and scan the QR code
attached to my Missing Assignment form and fill it out. This sends an email directly
to their parents and keeps a record for me.
That’s all
there is to it! I absolutely love this feature Google provides. When my
students don’t have their homework, they know to go and scan the QR code
attached to my Missing Assignment form and fill it out. This sends an email directly
to their parents and keeps a record for me.
A common
concern is “Well, the student can just put any old email address in there. How
do I know they are actually trying to email their parents?” And to that I say…you don’t. Without micromanaging
(which is what this whole process is trying to avoid) you don’t know if the
student, in that moment, is emailing their parents. However, you can periodically check the
spreadsheet (which records what email the student it putting in) and then
inform the parent that their child is trying to be a bit sneaky. Not foorproof,
but so much better than manually entering in students names and email
addresses.
I hope this helps
make your life a little bit easier! Happy tech-ing!


