Showing posts with label Engagement. Show all posts

Friday, March 18, 2016

Making Math Real: Percent, Discount, Sales Tax

One of the things I love about teaching math is that there is so much real-world application. Along with Science, it is one of the only subjects where, most of the time, I can make real-world connections with my students.

One of the things I hate about teaching math, is that the curriculum so infrequently reflects this real-world connection. (Sidenote: I recently stopped my lesson on probability with a 32 second mini-rant about how I have never in my entire life flipped a coin then spun a spinner and cared about the result. Honestly, come on curriculum peeps)

During our unit on percents I tried to remedy this lack of connection. I chose to take a lesson that involved 10 questions on discounts and sales tax and open a "mini-mall" in my classroom. I'm sure other teachers have done this much more effectively, but I had one day for this lesson (and I'm cheap and wasn't going to go out and buy a lot of items for my students to purchase like some much-more-awesome-than-me teachers do).


This is a great activity you can use for your students with minimal set up and high engagement.

Here's how it works:


  1. Split your class into groups of 4. Each group will get one "Amount to Spend" card. I chose to use QR codes so students wouldn't be fighting over getting the larger amounts. 
  2. Each student gets one "Discount" card. 
After that it is pretty much up to you how to run it. Here is what I did..
  1. Students go a few at a time to the "mall" (a table in the back of the room where all the items to purchase are laid out) and choose one item. I made several copies of the items so there was enough for everyone and several of the popular items were still available. 
  2. In groups, students calculate the amount of their item by find the discount and subtracting it. **An alternative is to have each member choose an item and then the group decides how to allocate their discounts. This gets them thinking a little more. 
  3. Groups complete the recording sheet. If they have more money remaining after each member purchases something, they decide together what else to purchase and return to the "mall"
  4. I announce that the mall is closing and if they want to make any final purchases, now is the time.
  5. After closing, groups calculate the amount they spent. Then they calculate the sales tax for their items and answer the discussion questions. I had my students do their work on butcher paper on the desks, because that's fun. They could do whiteboards or notebooks, whatever floats your boat.
I love that this brings in real world topics like budgeting, over and under spending, sales tax (and why you have to pay it) and so many other skills that many of my students are unfamiliar with, while also teaching the skills of finding percent and discount. 

This activity was super easy to make, but if you don't want to reinvent the wheel, it is available at my shop on Teachers Pay Teachers shop. Click the button on the right sidebar or click here

Enjoy!

Thursday, March 3, 2016

Tis the Testing Season

Tis the season.

State testing is upon us.


I teach in a large public school district in Texas which means the next few weeks will be filled with kitchy slogans somehow incorporating the word "STAAR." ("Shoot for the "STAARs!" "Be a STAAR!" and so on...)

With STAAR and other state tests fast approaching, teachers, administrators, and specialists are working and straining to find engaging (yet structured) ways to review an entire year's worth of material in 2 - 4 weeks. The problem is, there are many students who have mastered the material, and many who did not and need to be retaught pretty much everything.

There are oodles of ways to go about reviewing and many activities to trick students into practicing their material. Here is one method I've used successfully.

QR Code Scavenger Hunt:

Here's how it works. Each student needs a recording sheet and maybe a partner because that's always more fun. Cut out the cards lengthwise so that there is an answer and a QR code together, and post around the room. Students can start at any question. They scan the QR code on the right and answer the question, showing their work on their recording sheet. Once they have their answer, they look for the card with that answer on the left side. When they find it, they scan the QR code on that card to get their next question. If done correctly, students should see all questions and end up where they started.

The first time I did this I had low expectations, but I was surprised! Something about the magical QR code goodness sucks them in more than just your regular, old scavenger hunt. Try it. It's fabulous!


(Shameless plug)
Available at TPT: 


And the low-tech, QR free option for 7th Grade

Friday, February 5, 2016

Mind the Gap: Student Paced Video Lessons

I teach 7th grade math at a junior high. At this school, we have two options for the "sevvies" as they join us from their cutesy elementary worlds: 7th Regular Math, 7th Pre AP math. Your higher-achieving students (or those with high achieving parents) opt for Pre AP and everyone else is slotted into regular. I don't mean this to say that those students in my regular classes aren't high-acheiving, quite the opposite for some. In a gentle way, some students who are in my class should be in Pre AP, but they may not have someone at home encouraging them to try for more or to challenge themselves, so they take regular math and it's a breeze for them.

I have other students who are, let's say, less than motivated; and who have been less-than-motivated for quite a while and are now drowning in the wide gaps in their math knowledge. Also throw in the mix students who work really hard and want to be successful, but just struggle with numbers. Next, add in a dash of  students who are new to the country and are just trying to keep their head above water as they are learning a new culture, language, education system and more. 

With all of that, I have a class with a wide range of ability, motivation, and knowledge and, as the Brits say, I need to mind the gap (I'm pretty sure that's meant in a very different context, but it sounds great in a British accent in my head, so I'm going with it). 

There is a wide gap between my high-achieving and my low achieving students. Between my native speakers and my language learners, between my motivated and my "ehs." I have one class in particular that is all over the place and I have been struggling with how to get a lesson to them...to ALL of them. 

So, I tried something that worked...pretty well. I used two pieces of tech for this to work: an app called ShowMe and QR codes.

If I am going to be out for a personal day or training, to make sure my kids get the lesson, and to make it easy on the sub, I will record the lesson using the Show Me app. I am cheap, so I use the free version of the app which is very limited in what it can do, but it gets the job done. Usually, I will take screen shots or pictures of the worksheet I am doing and will insert it in as a photo so I can model and write on it. Feel free to play around with it and I will work on a post with the ins and outs of Show Me because it has one feature I love. What I love about Show Me is that, when you make a video, you can host it through Show Me. That means, when you create a video, you get a link to that video you can send to others or, as I'll show in this post, attach to a QR code. Why is this great? With other programs, you will have to upload and host your video to another site, like YouTube. That's fine and dandy if you want your voice all out there on the internet, but not me, no way. And also, our school blocks YouTube which means the kids, the people who need the video the most, can't get to it. So, yeah, that won't work. 

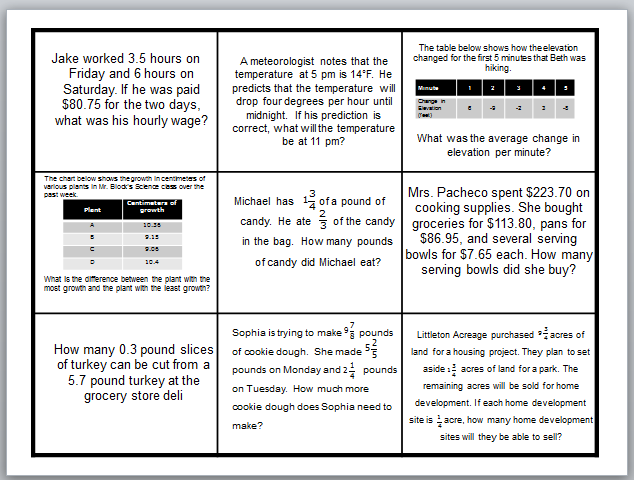
First things first: Make your video. This day's lesson was learning to find the surface area of pyramids from nets. We had already learned how to find the surface area of prisms so it was kind of a review, or at the very least, most students could figure it out without a lot of extra instruction. So, I had 5 questions I wanted them to know how to solve, so I made 5 videos, one for each problem that showed me working them out and the steps to solve. Each video was 1:30 to 2 minutes long. After I made the videos, I emailed the link to myself and created a QR code for each link (if you don't know how to make a QR code, read here).
Choose your video from your dashboard on Show Me.
Click the arrow-box thing to share your Show Me video.
I usually email it so I have the link for QR codes or putting on class website.  

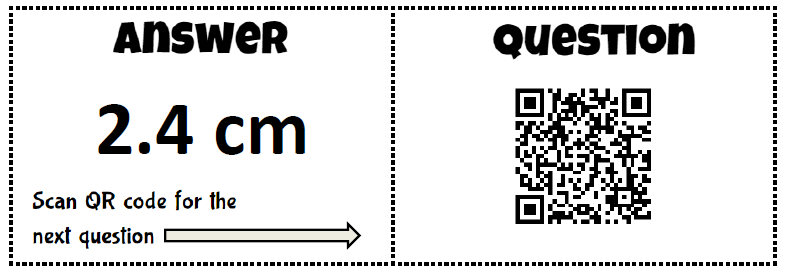
I then made a text QR code that when scanned would show the correct answer to the problem. 

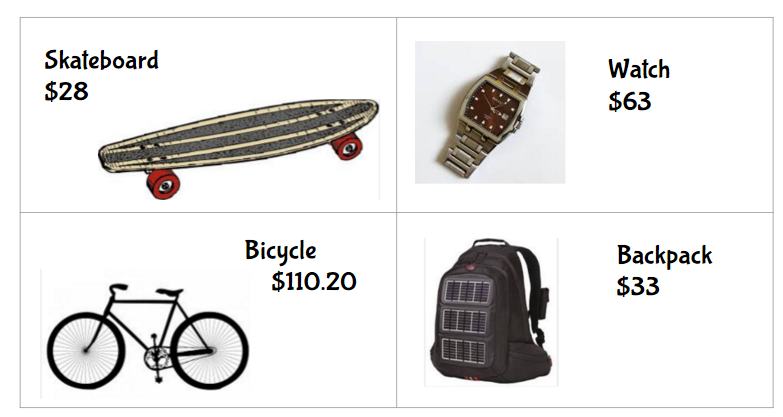
Finally, I put it all together using Powerpoint (I wasn't making a presentation, I just find things are easier to manipulate on Powerpoint instead of Word). I included the text of the question, an image (if needed) and the two QR Codes, one for the answer, one for the video. 


I made one card for each question, each a half page and printed them out on color paper (because that's more fun...but certainly not necessary). I printed enough for students to work in partners. After introducing what we were going to do, I gave each pair a set of the 5 cards and an iPad (we only have enough iPads for pairs, at best). Students worked out the problem on their own worksheet instead of writing on the cards (ain't nobody got time to make sets for each class). 

When they got their answer they scanned the Answer QR code. 

Scanning the QR Code
(Have you tried to screenshot before the reader grabs the code? Not easy)
What will appear after scanning "Video Help" QR Code

If they got it right, they moved on. If their answer was incorrect I asked them to compare their work with their partners, see if they made a calculation error and try and figure out what they did wrong (I like a little self-discovery in math). If they still couldn't figure out where they went wrong, they scanned the code and watched the short video of how to solve. 

Guys, this was amazing. 

The more advanced students paired together, solved the problems, then got to business on their homework. They weren't bored and shouting out as we slogged through at a pace that wasn't good for them. 

The shy students who are scared to ask for help had the help in their hands. I could literally help 15 groups of kids at one time through the videos. 

Students who knew most of the problems didn't have to hear their teacher prattle on about how to solve, instead they got help on exactly what they needed help on. 

And, an added perk is that I had to speak significantly less that day since my "lesson" was on the videos and could just be replayed. Instead, I walked around and corrected errors as I saw them and offered assistance exactly where it was needed instead of a blanket instruction to all. Students could work at their own pace and have their individual needs met, which I find is so hard to get done in a math classroom, especially one as diverse in ability levels as mine. 


I hope this was helpful. If you have tried other methods to solve this problem I would love to hear them! Until next time, happy tech-ing!


Thursday, February 4, 2016

Goodbye Kahoot, hello Quizizz!

I’m tired. I’m tired of tests. I’m tired of quizzes. I’m tired of bubble sheets and booklets.

I’m tired of tired games. I’m tired of Jeopardy. I’m tired of Kahoot (gasp!).

I’m ready for the new Kahoot, the new informal assessment, the new game.  Enter quizizz.


Quizizz is amazing. It is easy to create, easy to use, and it comes with a little bit of snark from the memes it throws into the mix. If you’ve used Kahoot, then Quizizz will be a breeze for you and you will love it. There are a ton of great features:
  • Quizizz lets you search public quizzes that have already been created and pick and choose questions from those to add to your quiz. You don’t have to reinvent the wheel and create all new questions, nor do you have to take someone else’s dumb question and include it in your quiz because you couldn’t delete it. Yay!
  • Unlike kahoot, the answer choices appear on the student’s screen. No more trying to navigate shapes and color to get your answer!
  •  Quizizz allows you more control over the time given for each question. It still isn’t enough time to solve a complicated math problem, but it’s better.
  •  It’s cooler. Quizizz assigns each player (student) a creepy little monster to be their avatar. When they answer a question a meme pops up (you can turn this feature off, but don’t, it’s amazing – and they’re all appropriate), a snarky one if they got it right, a “good job” one if they got it right. There is also a score board bar that tracks who is in the lead that helps encourage some friendly competition.
  •  The reports for each quizizz are amazing too, allowing you to take a grade when the kiddos thought they were just playing a game!

So, enough about how awesome it is, here is how to set it up!

First, you’ll need to create an account with quizizz and log in. 


Aft you login, you can begin creating your quiz. There are two ways to go about this. If you know the questions you want on y quiz, you can opt to Create Your Own Quiz. 

If you know the topic you would like, but can’t be bothered to create or type in your own questions (I feel you – it’s February. Survival mode) then you can type your topic in the “Search for quizzes” box. 

After you search, you can preview each of your results your results and see what the questions are like. If, as you’re looking through, you don’t see any you like, or see only a question here or there, you may want to create your own. To do that, go to the top bar and click “create”.


You will be prompted to name your quiz here. From there you add questions on the left hand side of the screen. Like Kahoot, all questions are multiple choice and you must include two answer choices and indicate which is correct.
You can add an image to your question as well. I often use this with math problems. I will take a screen shot of the diagram or shape I want in my question, save it, and insert it into the quizizz. 


For you math people, you can also use the options on the top bar to add in special characters. I haven’t figured out a fraction system (instead of just using super and subscript and a /) but if you’re smarter than me and figure it out, please let me know!


If you didn't want to type in your own questions, but wanted to use other's questions that were already made, at the top of the screen, type your topic into the "Search for Questions" box and click go. You will see the same quizzes you saw on the home screen search and the questions. Find the question you want and click the red plus sign that hovers on the photo. 


Once you have all of your questions entered, click “Finish”. You will be prompted to select the subject and topic. This is so others can find and use your quiz questions if they want.


Now it's time to play. At the top of the screen, click on "My Quizizz" and select the quiz your created. The screen below will appear. If you are playing as a class, click on "Play Live"


The next screen will allow you to set the settings. I always leave Leaderboard on to encourage a little healthy competition...your choice. I also leave the Show Memes on because memes are great and middle school kids (and their teachers) love them. I usually turn the Play Music off because my kiddos are using iPads with no headphones and the music will drive anyone insane. Depending on the activity I might leave the timer on or off. I usually turn it off because it's math and it takes a bit of time. I want them to not feel pressure to choose a random answer, but to take their time and work the problem. If this was a vocabulary game I would leave the timer on. Your choice!
After your settings are good to go, click play and your screen will show the code students use to access the game. Quizizz isn't an app (yet) so they will have to use the browser. On the iPads, I created a shortcut that I could leave on the homescreen to make it easier. Students will enter the game using the game code. 


When students enter the game, here are some things they will see....


Student screen after tying in code.
Their rank is shown after each question
 (I was testing this with one "student" (me)
An example of a meme that comes up
after an incorrect response.
Example meme after a correct response.

So, there you go, that's Quizizz. I hope you try it out. It is very user friendly and perfect for middle and high school students. Let me know how it goes! Happy tech-ing!


Sunday, January 24, 2016

QR Codes - Activities

For the first few months on the math team at my new school I was known as the "QR code" girl.
I love QR codes.
Seriously.

They make so many activities and tasks in the classroom easier. A quick shortcut to a website, a link to a video, a cute picture at the end of an activity, and so much more!

Today I wanted to share a few ways I use QR codes in my math classroom, specifically with activities. I will write a post at a later date about how I use QR codes in other ways. Stay tuned!

After we teach a specific skill (area of polygons, solving equations, volume, etc) that just needs some practice and application, I begin to think in QR codes. I like to give my students a chance to practice the skill before we dive deeper into real-world application. I also like for them to be able to practice with a partner or small group and be able to check their own work because, honestly, I can't be bothered.

Here is how I use QR codes to help me:
1) I have 10-12 problems (or less, or more, up to you) that I want my students to solve and the corresponding answers.
2) I create a matching game in powerpoint (can use one of the editable docs I'll provide here).
3) I then generate a QR code with what I want the student to see if they get the answer right. I usually use well-known memes or characters I find in a quick google search. When I find the photo I want, I copy the image address and head on over to qrstuff.com to create my QR code. Here are some step-by-steps if you've never made a QR code:

  1. go to www.qrstuff.com
  2. "Data Type" - weburl
  3. copy link for image into URL box
  4. Click "Download Code" on the right (you can't copy and paste the code, you must download it)
I then put a code for a different image for each of the pairs of questions and answers. I split it between the two boxes on the table.

Cut the cards out along the lines in the table. This will split the QR code in two. When the kids begin the activity, they solve the problem, find the matching answer, line up the QR code and scan. If they don't have an image pop up their either have the wrong answer, or they just need to adjust the code so it is lined up correctly. 

My students LOVE this activity! I usually have them just turn in a list of the characters that came up when they scanned (I usually use Disney characters as most students recognize them). 

Another activity I have used is to create one large (8.5 x 11) QR code puzzle. The puzzle is a 3 x 3 grid (made on Powerpoint) with 9 questions. You coordinate the answers on an equally sized table (for exact placement of questions, use template, downloadable below). Print the questions on one page, but the answers and QR code page, print front to back and cut out. The students place the correct answers on the question, face down so that the QR side is up. when they place the pieces correctly, they can scan the QR code and a picture will show up! (Make sure all edges are as in line as possible. Even if it isn't perfect, it will still scan).

Lare QR on 8.5" x 11"
Answers.
Questions.

If you are not a math teacher this could be used for vocabulary practice in any subject! I hope this gives you a new idea of a way to incorporate QR codes into your activities!

Freebies:

QR Matching Game

Lare QR Code Puzzle