Friday, January 29, 2016

Make Parent Notification Easy: Linking your Form with a Google Add-On Mail Merge


I promised a follow-up to the post about QR codes and Google Forms teaming up. This is probably the best feature of Forms and I’m so excited to share it with you.

I wanted a way to let parents know when their child came to class without their homework, 1) for documentation purposes, 2) I honestly wanted to bug the parents so maybe they would bug their child about getting their homework turned in. I figured getting an email each day letting you know your child didn't turn in their homework could lead to some parental intervention. 

While I wanted this, there was no way I was sitting down at the end of each day and sending 1 to 379 emails to parents about their child's missing homework. Talk about streamlining the process – a simple Google Sheets add-on makes this process simple, easy, and requires almost nothing from the teacher after set-up. 

So, without further ado, here is how you get your form to send an email each time a response is received.

{I am showing this from a teacher perspective – sending emails to parents each time an assignment is missing. But this could be used for SO many things: responses to items parents signed up to bring for a class party, email reminders about volunteer sign up times, etc.}
What your set-up form looks like to others.


First, you will need to set up your form. For those steps, you can read my post here. This post talks about setting up the form, but also linking it with a QR code for ease of access.

After setting up your form:

1. Access your results spreadsheet. To do this, click on "View Responses" from your Form. This opens up the spreadsheet where your Form responses are kept. 


Your responses from your Form. 

2. At the top toolbar, click on “Add-ons” and then “Get Add-ons..”


3. Search for “FormMule”. You are looking for “formMule-Email Merge Utility”. Click “+Free” to install the Add-on


4. After it installs, you will need to re-click on Add-ons and Click on formMule à Setup àChoose source data and set merge type.


5.  Under Choose source data and set merge type go to the drop down menu and select “Form Responses 1” Make sure the option on the left, under Form trigger is set to “On”. This is what makes the form send an email after each submission.


6.  Click Next: Templates and Send Condition

7. Under “How many unique email templates do you want to use” choose 1. You can rename your template if you want. Make sure Send Condition is set to “—Send for all rows”
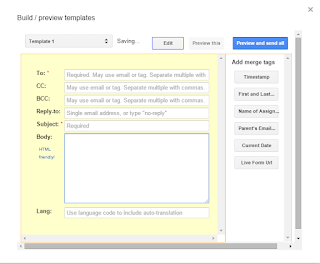
8. This next screen allows you to build your template that will be used for your email responses. If you have ever done a mail merge, this will be familiar. Set up your items below:


To: use the column title you used for the Parent’s Email address
CC: (leave Blank)
BCC: If you need to BCC: yourself, put your email address there and in the Reply To section
Subject For the subject, you can make this a generic “Missing Assignment” title or you can specify it by naming it “First and Last Name: Missing Assignment.” If you do that, make sure you click to submit that column title from the options on the right (instead of just typing :First and Last name)
Body: Type what you want in the body. I included my template below if you need an idea.


Parent/Guardian:
This is an automated email.
<< FIRST and LAST name>> did not return his/her assignment, <<Title of the missing assignment>>. He/she will be required to stay after school to make up the assignment.
Let me know if you have any questions.
Amber Bond
7th Grade Math
XYZ Junior High


9. When you are finished building your template click “Preview and send all.” this will take you to a new screen that shows you a preview of your template. If everything looks good you can click “Send Now” at the bottom and an email will send for all of the submissions already in your spreadsheet.
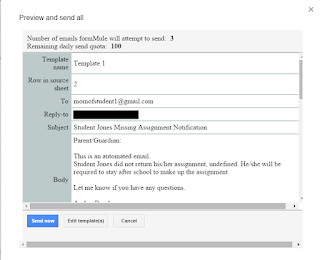
A preview of what the emails your Form sends will look like. 

From now on, an email will send automatically after a submission is made in the form. 

Your results spreadsheet will now have a new column with the date and time the emails were sent as well as saying who they were sent to and from. 


That’s all there is to it! I absolutely love this feature Google provides. When my students don’t have their homework, they know to go and scan the QR code attached to my Missing Assignment form and fill it out. This sends an email directly to their parents and keeps a record for me.

A common concern is “Well, the student can just put any old email address in there. How do I know they are actually trying to email their parents?”  And to that I say…you don’t. Without micromanaging (which is what this whole process is trying to avoid) you don’t know if the student, in that moment, is emailing their parents.  However, you can periodically check the spreadsheet (which records what email the student it putting in) and then inform the parent that their child is trying to be a bit sneaky. Not foorproof, but so much better than manually entering in students names and email addresses.


I hope this helps make your life a little bit easier! Happy tech-ing!

Thursday, January 28, 2016

QR Codes + Google Forms = True Love

As the title says, love is in the air. QR Codes plus Google Forms, here to make your life a little easier.
I recently got certified as a "Google Level 2 Educator." I'm not entirely sure what the implications are of that title, but I learned a lot about Google programs, apps, extensions, and more. This is a trick I learned that will make some of the logistics of your day so much easier. Before I give you the steps, let me tell you how I use this:

1) Keeping a record (including time and date) of who comes to tutoring when and for what. This process gives me a constantly updated spreadsheet of who came to tutoring on what day and what they did and I don't have to do a thing to keep up with it!
2) Anytime a student is missing an assignment (typically homework) I keep a record of it for end-of-semester grade talks and potential retention meetings, or just your run-of-the-mill parent conference. This handy-dandy process gives you another spreadsheet of date, time, student name, and assignment missing and I don't have to do a thing to keep up with it!

**The one item that can be added on to this that makes it from awesome to super awesome-sauce, is a parent email that notifies the parent each time - whether it is that their child stayed for tutoring, or that their child is missing an assignment and, you guessed it...you don't have to do a thing to keep up with it! I'll follow up with that in my next post!


So here's what I'm talking about: a google form accessed by a QR code. A form that keeps track of parent communication, tutoring attendance, or missing assignments. Here's what you do:

1. Go to Google Forms and create a new form. Title the form "Missing Assignments" (or your choice)
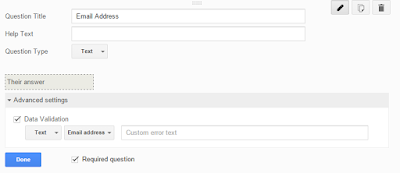
2. Add questions with "Text" as the question type for each piece of information you want:
  • Student Name
  • Class
  • Title of the Missing Assignment
  • **Parent Email (they may not know their parents email, this could be an issue. Or, they try and type it in wrong. Even if they put in the wrong email purposely you still have documentation)
    • For the email portion, click "Advanced Settings" and click "Data Validation" and "Email" 
**Only do this step if you want to send emails to let parents be notified. If an email is not necessary, you can skip this step. To see what to do to send out the emails, read my follow-up post here. 

3. Add an additional question with "Date" as the response type

For each "question" make sure you click "required question" When finished it will look like this:


To see what your form looks like, click "Live Form" on the tool bar. The page you see is what others see when they go to fill out your form.
Click to see what your form looks like to everyone else. 
     
What people see when they go to your form. 


When I create a new form, I like to do a "test" to make sure everything is working well. Go ahead and enter a few false entries on the form. After you type a few responses, go back to your Forms page. At the top toolbar you will see an icon that says "View Responses." This will take you to the spreadsheet that Forms creates to track the responses you receive from your form.


 My favorite feature is the time stamp. With so much documentation required in teaching, it's nice not to write the time and date. Thank you Google.

So, that's how you set up a form. The spreadsheet is created for you and saved in your Drive. To send the form to others you can use the blue "Send Form" icon at the top to email it. However, because QR codes are pairing up with Forms in this post, a more efficient way to use your form is to attach it to a QR code. That way multiple users can access the form without copying down a complicated URL. To do that, follow the steps below:

1) Click on "Send Form" and copy the link.
2) Use that link to create the QR Code
**If you don't know how to create a QR code, use my post here and follow the steps to create a QR code that links to a website.
3) Attach your code to whatever you are using it for. Below are two examples of posters I have in my room where the QR code links to a Google Form.


Used to keep track of who attends tutoring. Students scan with their phone when they come in and submit the form. No work required by me!
If a student comes to class without their homework they use their phone to scan the QR code and complete the form. That gives me a record of who does not have their homework each day (and keeps track of repeat offenders).

 So, there you go. QR Codes teaming up with Google Forms to make your life easier. I am doing a follow-up post (click here) that shows you how to take that spreadsheet and send a form email out from it each time a form response is recorded. This is how I let parents know, in real time,  that their student did not turn in their homework. Check back for that! Happy tech-ing!

Wednesday, January 27, 2016

How to Make a QR Code

By now you may have realized I like QR codes just a little. I love how easy they can make things. I use QR codes to link to forms, to engage students in an activity, to give a quick link to a video or website, and so much more. Because I love QR codes and use them so much, I take or granted the fact that not everyone knows how to make one or use them. I thought I would write a quick post about how I make a QR code to help you incorporate this lovely little tech tool into your classroom.


I'm sure there are a lot of different ways and websites to make QR codes, but I'll show you what I have used for the last few years that works very well (and free).

1. Go to www.qrstuff.com
2. Decide what you want your QR code to link to.
You can see from the list on the right that you can link to a website, YouTube video, all forms of social media, plain text, email address, and SO much more. The options that I use most frequently are website, YouTube Video, and Plain Text.
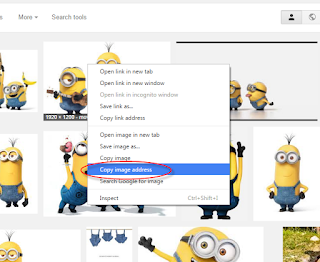
3. I'll show you how to link to an image. To link to an image, do a google search for your image online. When you find it, right click and copy the image address. 


4. Go back to qrstuff.com. Select website and copy the image into the address bar. The QR to the right of the screen will automatically change. You cannot right-click and copy the QR code, you must download and insert into your document from there.


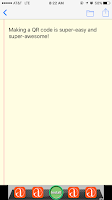
And that's it! It's always a good idea to double check your QR code to make sure it links to what you want it to. The steps are the same for YouTube video and for text. For text, your screen would look like this (below) and your QR code, when scanned will show the image on the right.
                     

Hope this helps take away some of the uncertainty of how to make a QR code! Happy teching!

Monday, January 25, 2016

Chevron Calendars

Every teacher needs a calendar. Or two. Or three.

Looking around my desk, I have three: large desk, planner, and these cute Chevron Calendars!

You can purchase them here in color and here in black and white!

Check back in the summer for the new 2016-2017 Colorful Chevron Calendar!


Sunday, January 24, 2016

QR Codes - Activities

For the first few months on the math team at my new school I was known as the "QR code" girl.
I love QR codes.
Seriously.

They make so many activities and tasks in the classroom easier. A quick shortcut to a website, a link to a video, a cute picture at the end of an activity, and so much more!

Today I wanted to share a few ways I use QR codes in my math classroom, specifically with activities. I will write a post at a later date about how I use QR codes in other ways. Stay tuned!

After we teach a specific skill (area of polygons, solving equations, volume, etc) that just needs some practice and application, I begin to think in QR codes. I like to give my students a chance to practice the skill before we dive deeper into real-world application. I also like for them to be able to practice with a partner or small group and be able to check their own work because, honestly, I can't be bothered.

Here is how I use QR codes to help me:
1) I have 10-12 problems (or less, or more, up to you) that I want my students to solve and the corresponding answers.
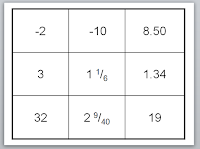
2) I create a matching game in powerpoint (can use one of the editable docs I'll provide here).
3) I then generate a QR code with what I want the student to see if they get the answer right. I usually use well-known memes or characters I find in a quick google search. When I find the photo I want, I copy the image address and head on over to qrstuff.com to create my QR code. Here are some step-by-steps if you've never made a QR code:

  1. go to www.qrstuff.com
  2. "Data Type" - weburl
  3. copy link for image into URL box
  4. Click "Download Code" on the right (you can't copy and paste the code, you must download it)
I then put a code for a different image for each of the pairs of questions and answers. I split it between the two boxes on the table.

Cut the cards out along the lines in the table. This will split the QR code in two. When the kids begin the activity, they solve the problem, find the matching answer, line up the QR code and scan. If they don't have an image pop up their either have the wrong answer, or they just need to adjust the code so it is lined up correctly. 

My students LOVE this activity! I usually have them just turn in a list of the characters that came up when they scanned (I usually use Disney characters as most students recognize them). 

Another activity I have used is to create one large (8.5 x 11) QR code puzzle. The puzzle is a 3 x 3 grid (made on Powerpoint) with 9 questions. You coordinate the answers on an equally sized table (for exact placement of questions, use template, downloadable below). Print the questions on one page, but the answers and QR code page, print front to back and cut out. The students place the correct answers on the question, face down so that the QR side is up. when they place the pieces correctly, they can scan the QR code and a picture will show up! (Make sure all edges are as in line as possible. Even if it isn't perfect, it will still scan).

Lare QR on 8.5" x 11"
Answers.
Questions.

If you are not a math teacher this could be used for vocabulary practice in any subject! I hope this gives you a new idea of a way to incorporate QR codes into your activities!

Freebies:

QR Matching Game

Lare QR Code Puzzle


Welcome!

Welcome to the blog! I am a middle school math teacher in Texas trying to make learning come alive for my students. Follow along as I post what works in my room (or attempts that don't work but are funny enough to share). I will include links to freebies in my room or things I have for sale on Teachers Pay Teachers. Enjoy!